Today, we bring to you another way of boosting your users’ adoption by making the standard Salesforce.com Address field very smart – plus solely by utilizing point-and-click Salesforce Lightning setup!
Today, we bring to you another way of boosting your users’ adoption by making the standard Salesforce.com Address field very smart – plus solely by utilizing point-and-click Salesforce Lightning setup!
Believe it or not, but you can create a simple process that automatically controls the quality of the users’ inputs within the Standard Address Field, informs about mistakes and even shows Google Maps graphical element on the record page layout without using a single line of code!
Technically is the logic presented in this blog applicable also on the Standard Address Field for Leads and Standard Shipping Address for Accounts. To keep it short, we focused the following text solely on the setup of the Account Billing Address Field as it was delivered within a real-life customer case by us:
Address Field Functions:
- Automatic control of the Standard Billing City Field according to the designated set of Postal Codes stored in the Postal Code Database
- Inherent warning projected to the user if Non-Existing Postal Code has been saved in the Standard Billing Address
- Support of multinational accounts associated with enabled State and Country Picklists
- Support of Duplicate Postal Code values – the customers’ country has even 131 legal Billing City entries for one single Billing Postal Code!
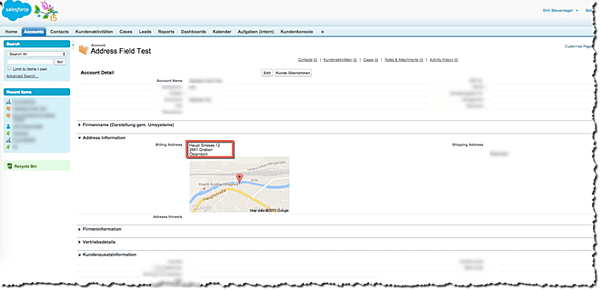
- And as an icing on top of a cake – projection of the Billing Address field into a handy Google Map graphical element on record detail view
Author’s notes: This Blog assumes State and Country Picklists enabled. This feature got delivered originally for a German-speaking customer – this explains some German locale used for the setup.
The entire setup recipe of the Smart Standard Address Field requires 1 custom object Postal Code Database, 1 simple Process, 1 Flow and 2 custom fields, some minor page layout edits plus some basic knowledge of Salesforce Lightning.
1. Postal Code Database:
Let’s start with the Postal Code Database custom object, which in reality does not do anything else than keep the legal combinations of all City Names and related Postal Codes for the Countries of your interest.
As you can see in the screenshot (German locale), such an object must contain at least these 3 custom fields: City Name (Stadt), Postal Code (PLZ) and Country Code (Ländercode). As mentioned in the beginning of this blog, records with duplicate Postal Code value are allowed – typically, there are more municipalities tight to the same Postal Code.
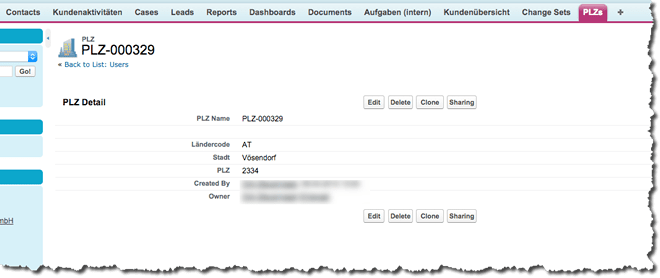
With a standard data upload, we inserted all the records to our Postal Code Database custom object (roughly 20,000 records for Austria). Don’t forget to equip every record with the Country Code value (English shortcut – in our case “AT”, as used by State and Country Picklists) in order to distinguish country-specific entries within our Lightning Flows we are about to build in a second.
2. Account Page Layout Edits:
To project the address evaluation results to the end-user, we need to create some custom fields and place them on the account page layout near the Standard Billing Address field. We need in total 2 custom fields, text and formula.
At this point we create a text field called “Adresse Hinweis” (German for “Address Helptext”), but don’t put it on the Page layout. We are going to need this field only for the Flow setup – we will create the formula field bringing some nice user-facing experience later.
Flow
The Flow (the only one we need) has the following structure:

1. Start Element, an Account Fast Lookup, searches for the correct Account (which triggered the Process to run) and saves its Billing Postal Code, Billing City and Billing Country Code within an SOBject variable.
A variable “AccountID” is used for identifying the right Account record. This “AccountID” will be populated later by the Process.
Author’s note: Optional: If you are concerned about the SOQL limits for mass edits, you can embed the first step directly into the Process when triggering this flow and populate the variable without the Account Fast Lookup.
2. In the next step, another Fast Lookup, this time on Postal Code Database, tries to find a match between the entered Billing Address and the Postal Code Database. It simply searches for a record with the same Billing Postal Code, Billing City and Billing Country Code as entered by user.
3. An important decision nod evaluates whether a record has been found in the step No.2!
4. If the SObject variable from Step No.2 is not Null (such a combination of Address was found) in the Postal Code Database, we simply update the “Adresse Hinweis” (the text field we created just a minute ago) on the account record with the text string: “Address Correct”.
5. On the other hand, if a record with a matching postal code has not been found in the Postal Code Database, we must investigate the user’s entry a bit further!
We have to analyse:
- Whether the Postal Code used is a valid Postal Code
- When it is a valid Postal Code, give some hints to the users what the correct value should be – supporting also multiple City Names for one Postal Code
In Step No.5, we use a Fast Lookup to search for all records in the Postal Code Database, which have the same Postal Code and Country Code as the user entered.
We store the results in the SObject Collection Variable – in the case of multiple results found, we need to go through them within a Loop to get some more info!
6. This step analyses how successful our search in Step No.5 has been. It checks, whether the SObject Collection Variable created in the previous step is Null or not.
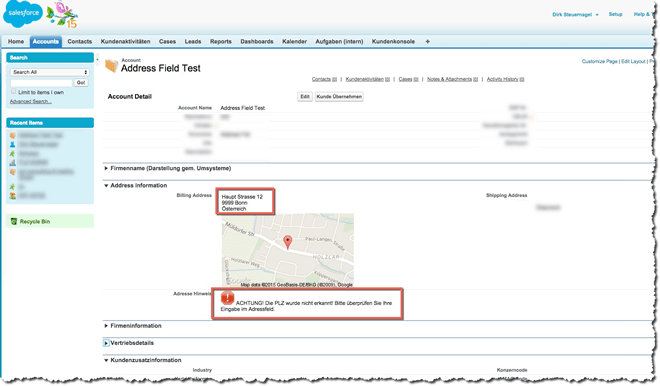
7. If it is Null (no records in the Postal Code Database are matching Postal Code and Country Code entered by user), then it means that the user made a mistake and used a Non-Existing Postal Code! We update the “Adresse Hinweis” (the notification field created) on the account record with the text string: "ACHTUNG! Die PLZ wurde nicht erkannt! Bitte überprüfen Sie Ihre Eingabe im Adressfeld." (Translation: “Warning! The Postal Code not recognized! Please check your Address entry.”)
8. If the SObject Collection Variable from the Step No. 5 contains at least one record (is not Null), we need to know how the first City Name and the number of records found.
Therefore we let the SObject Collection Variable from the Step No.5 run through a loop which helps us get both first found City Name and Collection Size (number of cities with the same Postal Code found).
9. For Step No.9, we need to create a text variable “CityNameLoop” and assign to it the City Name from the first record in the SObject Collection variable.
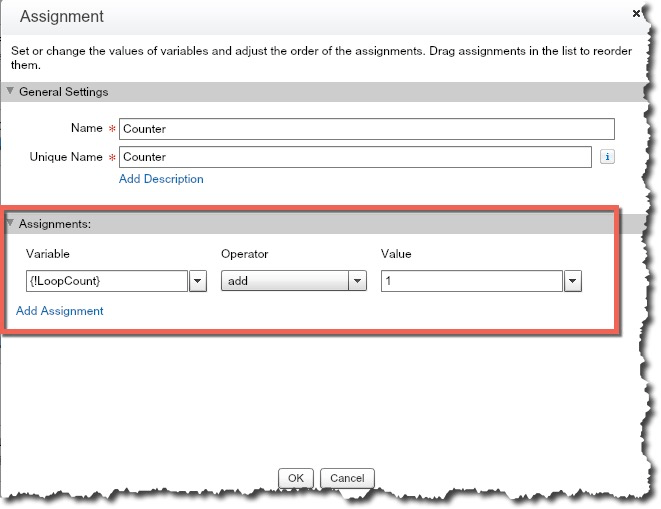
10. This step helps us identify the size of the SObject Collection Variable – we create a number variable “LoopCount” and set up this step to add “+1” to this variable every time it iterates through the loop. In the end, it returns the total number of records in the SObject Collection variable!
11. In the end of the loop, this step evaluates the value of the “LoopCount” variable (size of the SObject Collection).
We check whether it:
- equals 1 (exactly one record from the Postal Code Database has the same Postal Code and Country Code as the user entered.
- does not equal 1 (there are multiple records found)
12. If only one record has been found, we use the “Adresse Hinweis” on the account record to show the message using a formula (enables us to use merge fields):
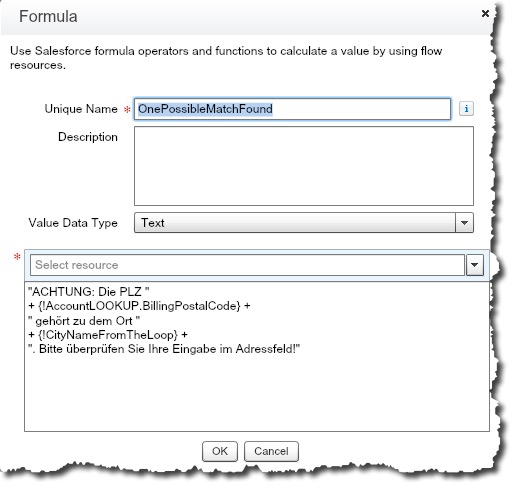
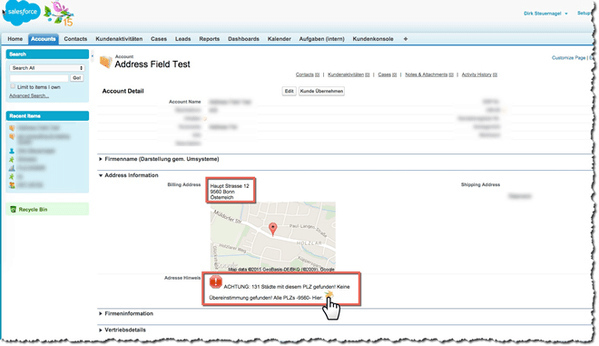
Translation: “Warning! [value of the LoopCount variable retrieved from the Step No.10] cities with this Postal Code have been found! No match identified!”
The Flow is ready to get activated, no let’s put quickly together the Process.
Process
It is super-simple and looks like this:
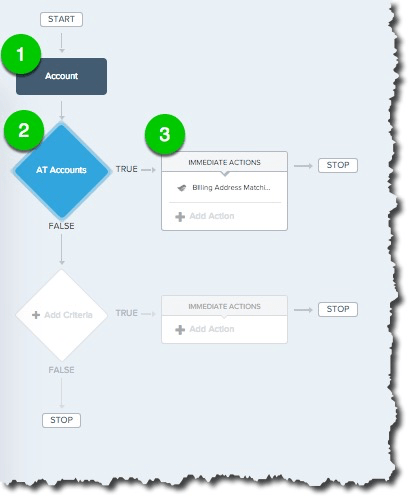
1. The process must trigger our Flow every single time when an Account record is created or edited.
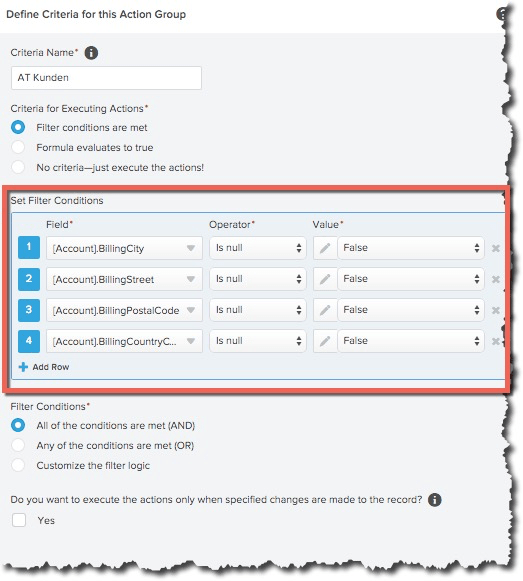
2. First Decision Nod evaluates whether we have all the necessary fields form the Standard Billing Address field on hand to successfully run our Flow.
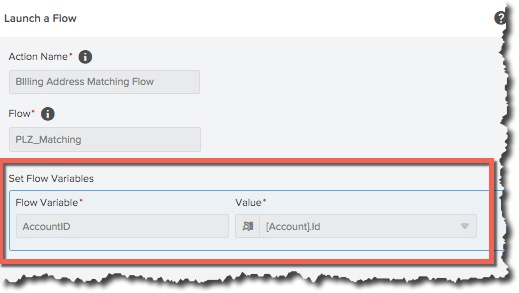
3. The last but the most important element of our Process is launching the Flow we created a while ago. We need to set the “AccountID” Flow variable to get populated by the account record ID.
Don’t forget to activate the Process in the very end!
Technically, we are done – but every good Salesforce.com Admin wants to go the extra mile to improve the solution! To do so, we need to create 1 custom report on our Postal Code Database and 1 text formula field to put on the account page layout.
Custom report on our Postal Code Database
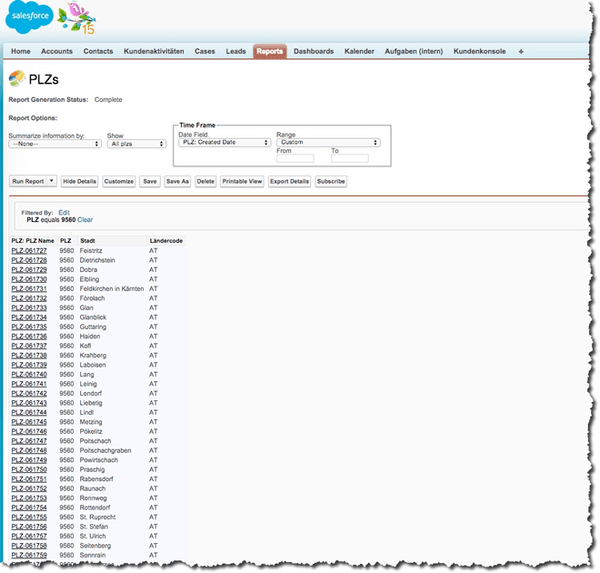
1. Create a very simple custom report on our Postal Code Database, add the Postal Code filter (leave it empty!) and save it in a publicly available folder so your users can use it freely.

2. Copy the ID of the report – highlighted in the green square in the attachment.
Custom formula field on the Account Page Layout
We have already created and used a text field “Adresse Hinweis” before. To make the results more appealing, we use this field within a new formula field, which we put also on the page layout.
The formula field identifies some key words in the “Adresse Hinweis” field already used by our Flow and changes the design of the message shown to the user. Do not forget to paste the ID of the custom report saved in the previous step to the last line of the formula ([ReportID])
 IF (
 CONTAINS( Adresse_Hinweis__c , "ACHTUNG")
 ,IMAGE("img/msg_icons/error32.png", "*" )
 +" "+
 Adresse_Hinweis__c
 + IF (
 CONTAINS( Adresse_Hinweis__c , "Städte")
 ,
 " Alle PLZs -"+ BillingPostalCode +"- Hier: "+
 HYPERLINK("/[REPORTID]?pv0="+ BillingPostalCode , IMAGE("/img/icon/form24.png", "*" ) ,"_blank" ) ,
 "")
 ,
 ""
 )
Then, place the field on the account page layout and let’s activate Google Maps element!
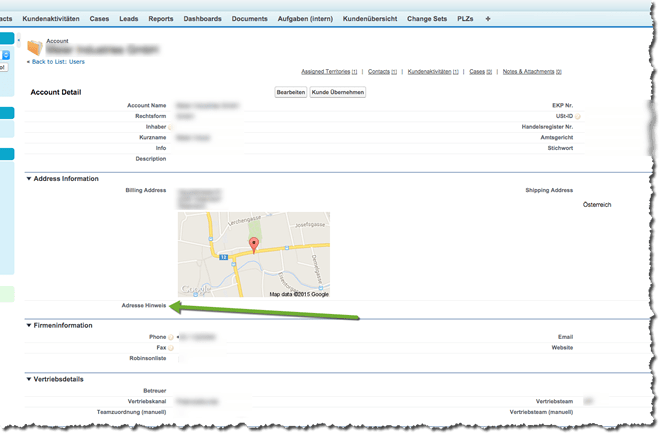
Author’s note: Place only the formula field on the page layout – In our case we manually changed the formula label to “Adresse Hinweis”, this is not the text field used within Flows!
Google Maps Element:
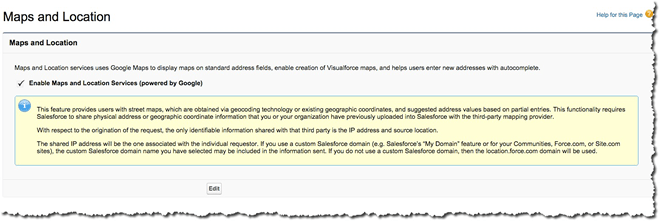
The last piece of setup puzzle is bringing in the Google Maps graphical element to the page layout showing the account’s address in a delightful image we all know from the Google mapping engine.
The setup itself is trivial – just enable Maps and Location Services (powered by Google) under Setup - Maps and Location.
FINISH! Make yourself a coffee and let’s check how smart our Standard Billing Address field just has become:
User Test Case
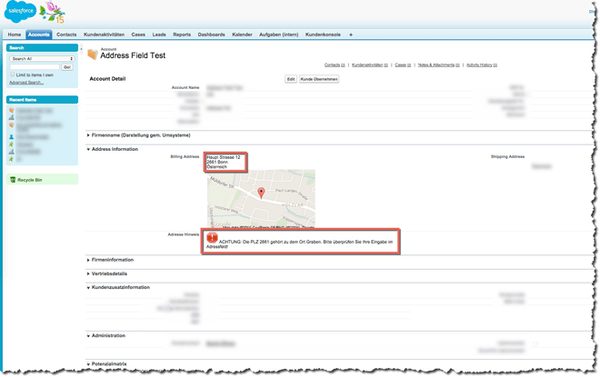
1. User uses a non-existing Postal Code in the Standard Billing Address Field when creating a new Account and can see the warning message about this fact below the address field.
2. User noticed the warning and edits the Postal Code in the Standard Billing Address. Unfortunately, the user made a mistake again – the user used an existing Postal Code but with wrong City Name. The user is informed that this Postal Code matches 131 Cities stored in the Postal Codes Database, none of them matching the currently selected City Name! After clicking the Notepad Icon, the user is automatically forwarded to a new window, where he/she can see the report with all the 131 Cities related to this Postal Code so he/she can easily select a legal value and correct the account data.
3. But our dis-organized user realizes, that the Postal Code on the account should be different! After the edit, he/she is notified that the value is again incorrect! But since such a Postal Code is related to only one record in the Postal Codes Database, a direct hint containing the correct City Name is projected on the contact detail view.
Finally, our user copies the City Name form the hint, paste it into Standard Billing City field and saves the record. Entry is evaluated as correct, no warning message must be shown to the user!